This month at the Daring Bakers we made Battenberg cake! I wasn’t familiar with the name but I had seen pictures of it before, and I found it so cute (especially considering it’s pink, my favorite color). So I was glad to have an excuse to make it.
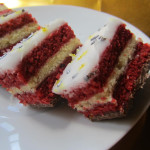
The cake is traditionally made with almond flour, layered with apricot jam and then covered in marzipan. Since I’m not an almond fan I made a coconut and raspberry Battenberg instead (with ground rice in place of almond), and covered it in fondant.
The best thing about it is that, even though it looks pretty impressive, it’s still really easy to make. You don’t even need a special pan; you can make a paper divider as Mandy shows, and bake the cake on a regular square pan. By the way can you believe I only got this pan less than half a year ago? I used to make round brownies all the time. I still do, occasionally, but I love my new square pan.
 |
| Even a 3rd grader could make a better cut, but the cake still turned out! See how easy it is? |
The hardest part was coloring the fondant. But you can see how in the end I got tired of kneading realised it would look better marbled. You don’t really need to do that though, it looks just as fine in white.
Now the downside about this challenge was that the cake was pretty dry. It was probably just me, since I didn’t see many DBers mention that. But if I were to make it again (totally possible since it’s so cute), I’d use a regular butter cake instead of the ground rice one.
Blog-checking lines: Mandy of What The Fruitcake?! came to our rescue last minute to present us with the Battenberg Cake challenge! She highlighted Mary Berry’s techniques and recipes to allow us to create this unique little cake with ease.
Coconut raspberry Battenberg cake
Yield: one 8″ x 4″ rectangular cake
For batter:
6 oz butter, softened
6 oz sugar
6 oz flour
2 1/2 tsp baking powder
1/4 tsp salt
3 large Eggs
2 1/3 oz ground rice (can be ground with a coffee grinder)
1 tsp coconut extract
pink or red food coloring
For assembly:
2/3 cup raspberry jam
1 cup fondant
dry coconut
1. Preheat oven to 350°F.
2. Grease an 8” square baking tin with butter, then line it with parchment paper, creating a divide in the middle with the parchment.
3. Whisk together the dry ingredients then combine with the wet ingredients in a large bowl, and beat together just until the ingredients are combined and the batter is smooth.
4. Spoon half the mixture into one side of the prepared baking tin.
5. Add a few drops of food coloring to the remaining batter, and stir until the colour is thoroughly distributed.
6. Spoon the pink batter into the other half of the prepared baking tin.
7. Smooth the surface of the batter with a spatula, making sure batter is in each corner.
8. Bake for 25-30mins until the cake is well risen, springs back when lightly touched and a toothpick comes out clean.
9. Leave to cool in the tin for a few minutes before turning out to cool thoroughly on a wire rack.
10. Once completely cool, trim the edges of the cake with a long serrated knife.
11. Cut each coloured sponge in half lengthways so that you are left with four long strips of sponge, and trim as necessary so that your checkered pattern is as neat and even as possible.
12. Gently heat the raspberry jam and pass through a small sieve.
13. Brush warmed jam onto the strips of cake to stick the cake together in a checkered pattern.
14. Dust a large flat surface with icing sugar, then roll the fondant in a rectangular shape that is wide enough to cover the length of the cake and long enough to completely wrap the cake.
15. Brush the top of the cake with jam.
16. Place the cake, jam side down, on one of the short sides of the fondant.
17. Brush the remaining three sides with jam.
18. Roll the cake to cover it in fondant, making sure the join will be underneath the cake once turned over. Carefully flip the cake over.
19. Brush the cake lightly with water and sprinkle it with dried coconut.
20. Neaten the ends of the cake and remove excess fondant by trimming off a small bit of cake on both ends to reveal the pattern.


Pingback: Daring Bakers 11-12: celebration cookies | Sabor Pastel